HarmonyOS cluster control is a setup for managing and operating many HarmonyOS devices (HarmonyOS Next) from one computer, in the same class of tool as Android cluster control and Apple cluster control. What this covers is flashing the ESP32 for HarmonyOS automation and testing the bind.
Prerequisites, and choosing the board and firmware
The threshold first: Bluetooth HID for HarmonyOS cluster control needs HarmonyOS USB central control 3.2.0 or later. Below that version the right-click menu has no Bluetooth HID settings, and Bluetooth events on the script side are unavailable.
In principle, on HarmonyOS Next the ESP32 board translates central control commands into Bluetooth HID and sends them to the phone. The phone acts only as the HID host, which means it treats the board as an external keyboard. The computer or the central control talks to the board over serial or Wi-Fi, and the board sends keys and touch to the phone. It can be combined with the HarmonyOS automation service, HarmonyOS mirroring, and USB HID, or Bluetooth can be used on its own for taps and keys. Real projects more often combine them: screenshots and image matching go through the automation channel, and taps go through the Bluetooth board. The iOS USB HID line is separate: since EC iOS USB 10.7.0 (2026-09-08), no board, the phone should be iOS 17 or later, and it is mutually exclusive with Start Automation. Do not flash iOS USB firmware onto this HarmonyOS board.
You buy the board yourself. The firmware is free. Settle four items before you order. Any one of the four wrong means a reflash:
| Item | Options | Notes |
|---|---|---|
| Chip | ESP32-C3 / ESP32-S3 | Firmware is separate for each |
| Board | Welded pins / non-welded pins | Firmware is separate |
| Features | With keyboard / without keyboard | System keys and shortcuts depend on the with-keyboard build |
| Platform | HarmonyOS and Android USB builds | Do not flash iOS USB firmware |
The firmware is in the product resources on the cloud drive. Open the HarmonyOS resource folder, then the Bluetooth firmware directory under the USB version. The flash steps themselves match Android. Two things while flashing: the chip model and the board type have to match the firmware exactly; after flashing, power-cycle the board, and do not leave it hanging on the flash tool. Close the flash tool when you are done. While the serial port is occupied, the central control cannot open it, which shows up as no device during bind, or a MAC that cannot be read.
Bind, test, and calling it from a script
In the central control, select a connected device, right-click into Bluetooth HID settings, and tap bind Bluetooth BLE.
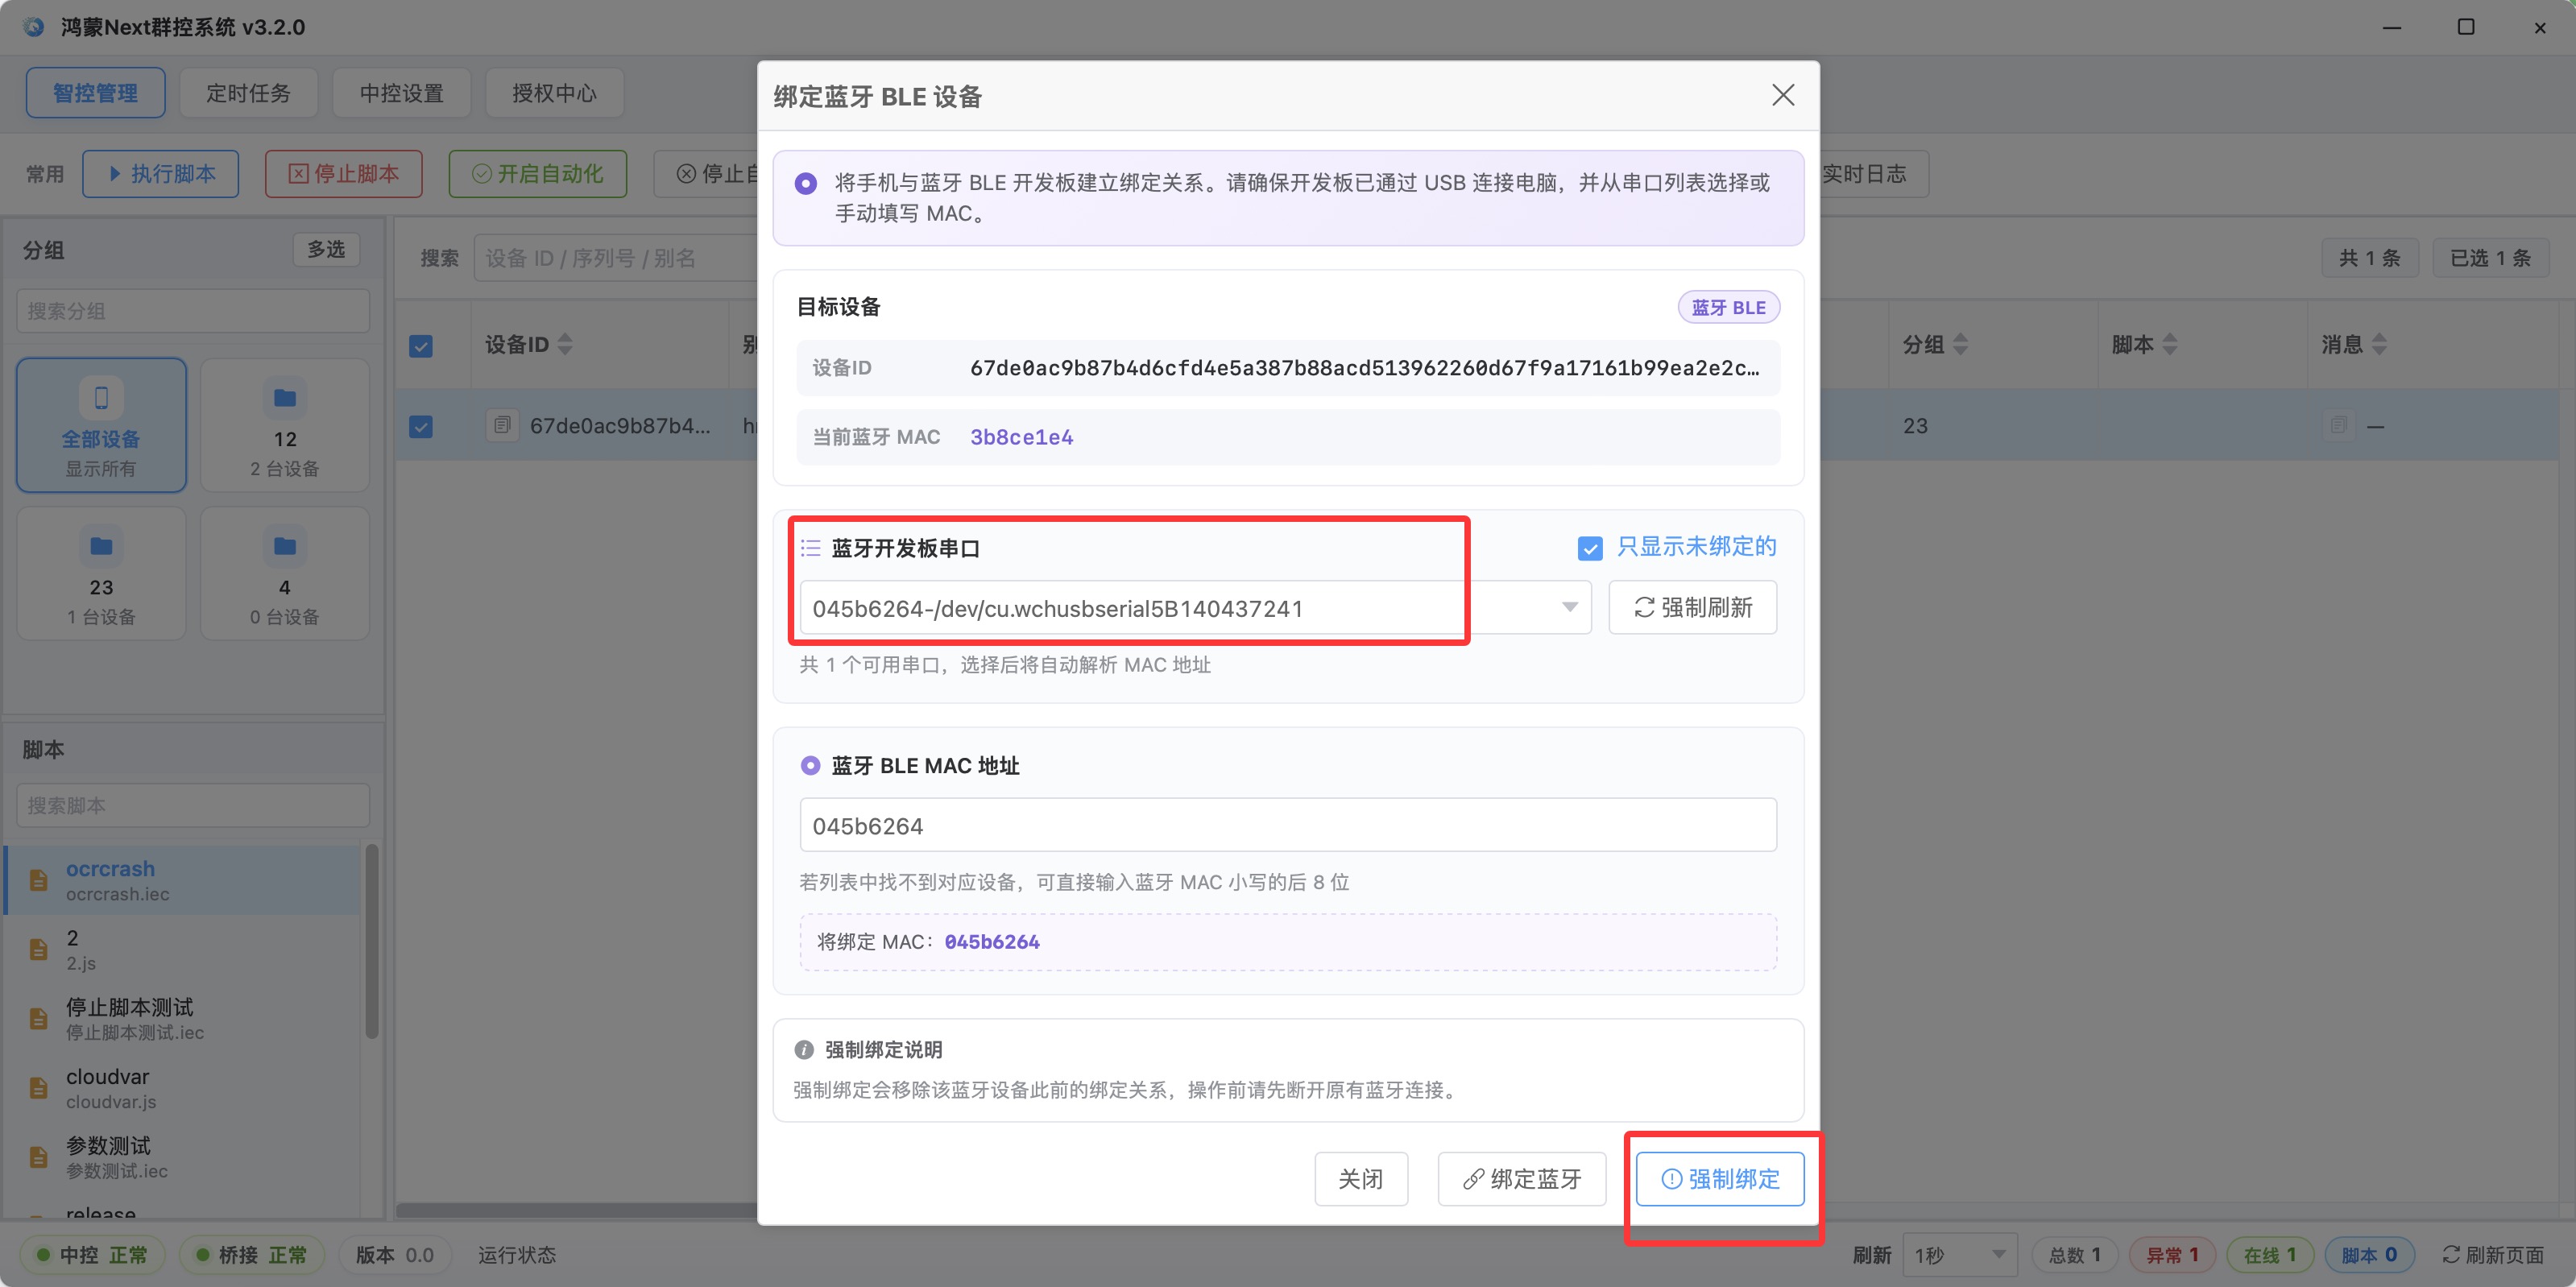
Pick the serial port in the dialog. If the list is empty, clear filters such as show unbound only and force a refresh. If it still will not appear, fill in the MAC by hand. What you type is the last 8 characters of the Bluetooth MAC. Where do you read the Bluetooth MAC? The board’s Bluetooth name is usually those last 8 characters, and the central control also reads it automatically when you bind the serial port. Label the board when it arrives. With several boards that saves repeated checking. After a successful bind, the Bluetooth MAC column in the device list shows the hardware address you just bound. The relationship is UDID to bleMac, one phone to one board, which also explains a limit: one board can connect to only one phone at a time.
A bind only creates the mapping. Whether the path is open has to be tested on its own. On the phone, open Bluetooth in Settings, search, and pair that board. The name is the last 8 characters of the MAC. The icon may be a keyboard or a mouse. If the system asks you to confirm an input-device permission, tap Allow. Back in the central control, right-click into Bluetooth HID settings, tap test Bluetooth BLE, leave the transport on serial by default, then tap a long-press touch or the HOME key.
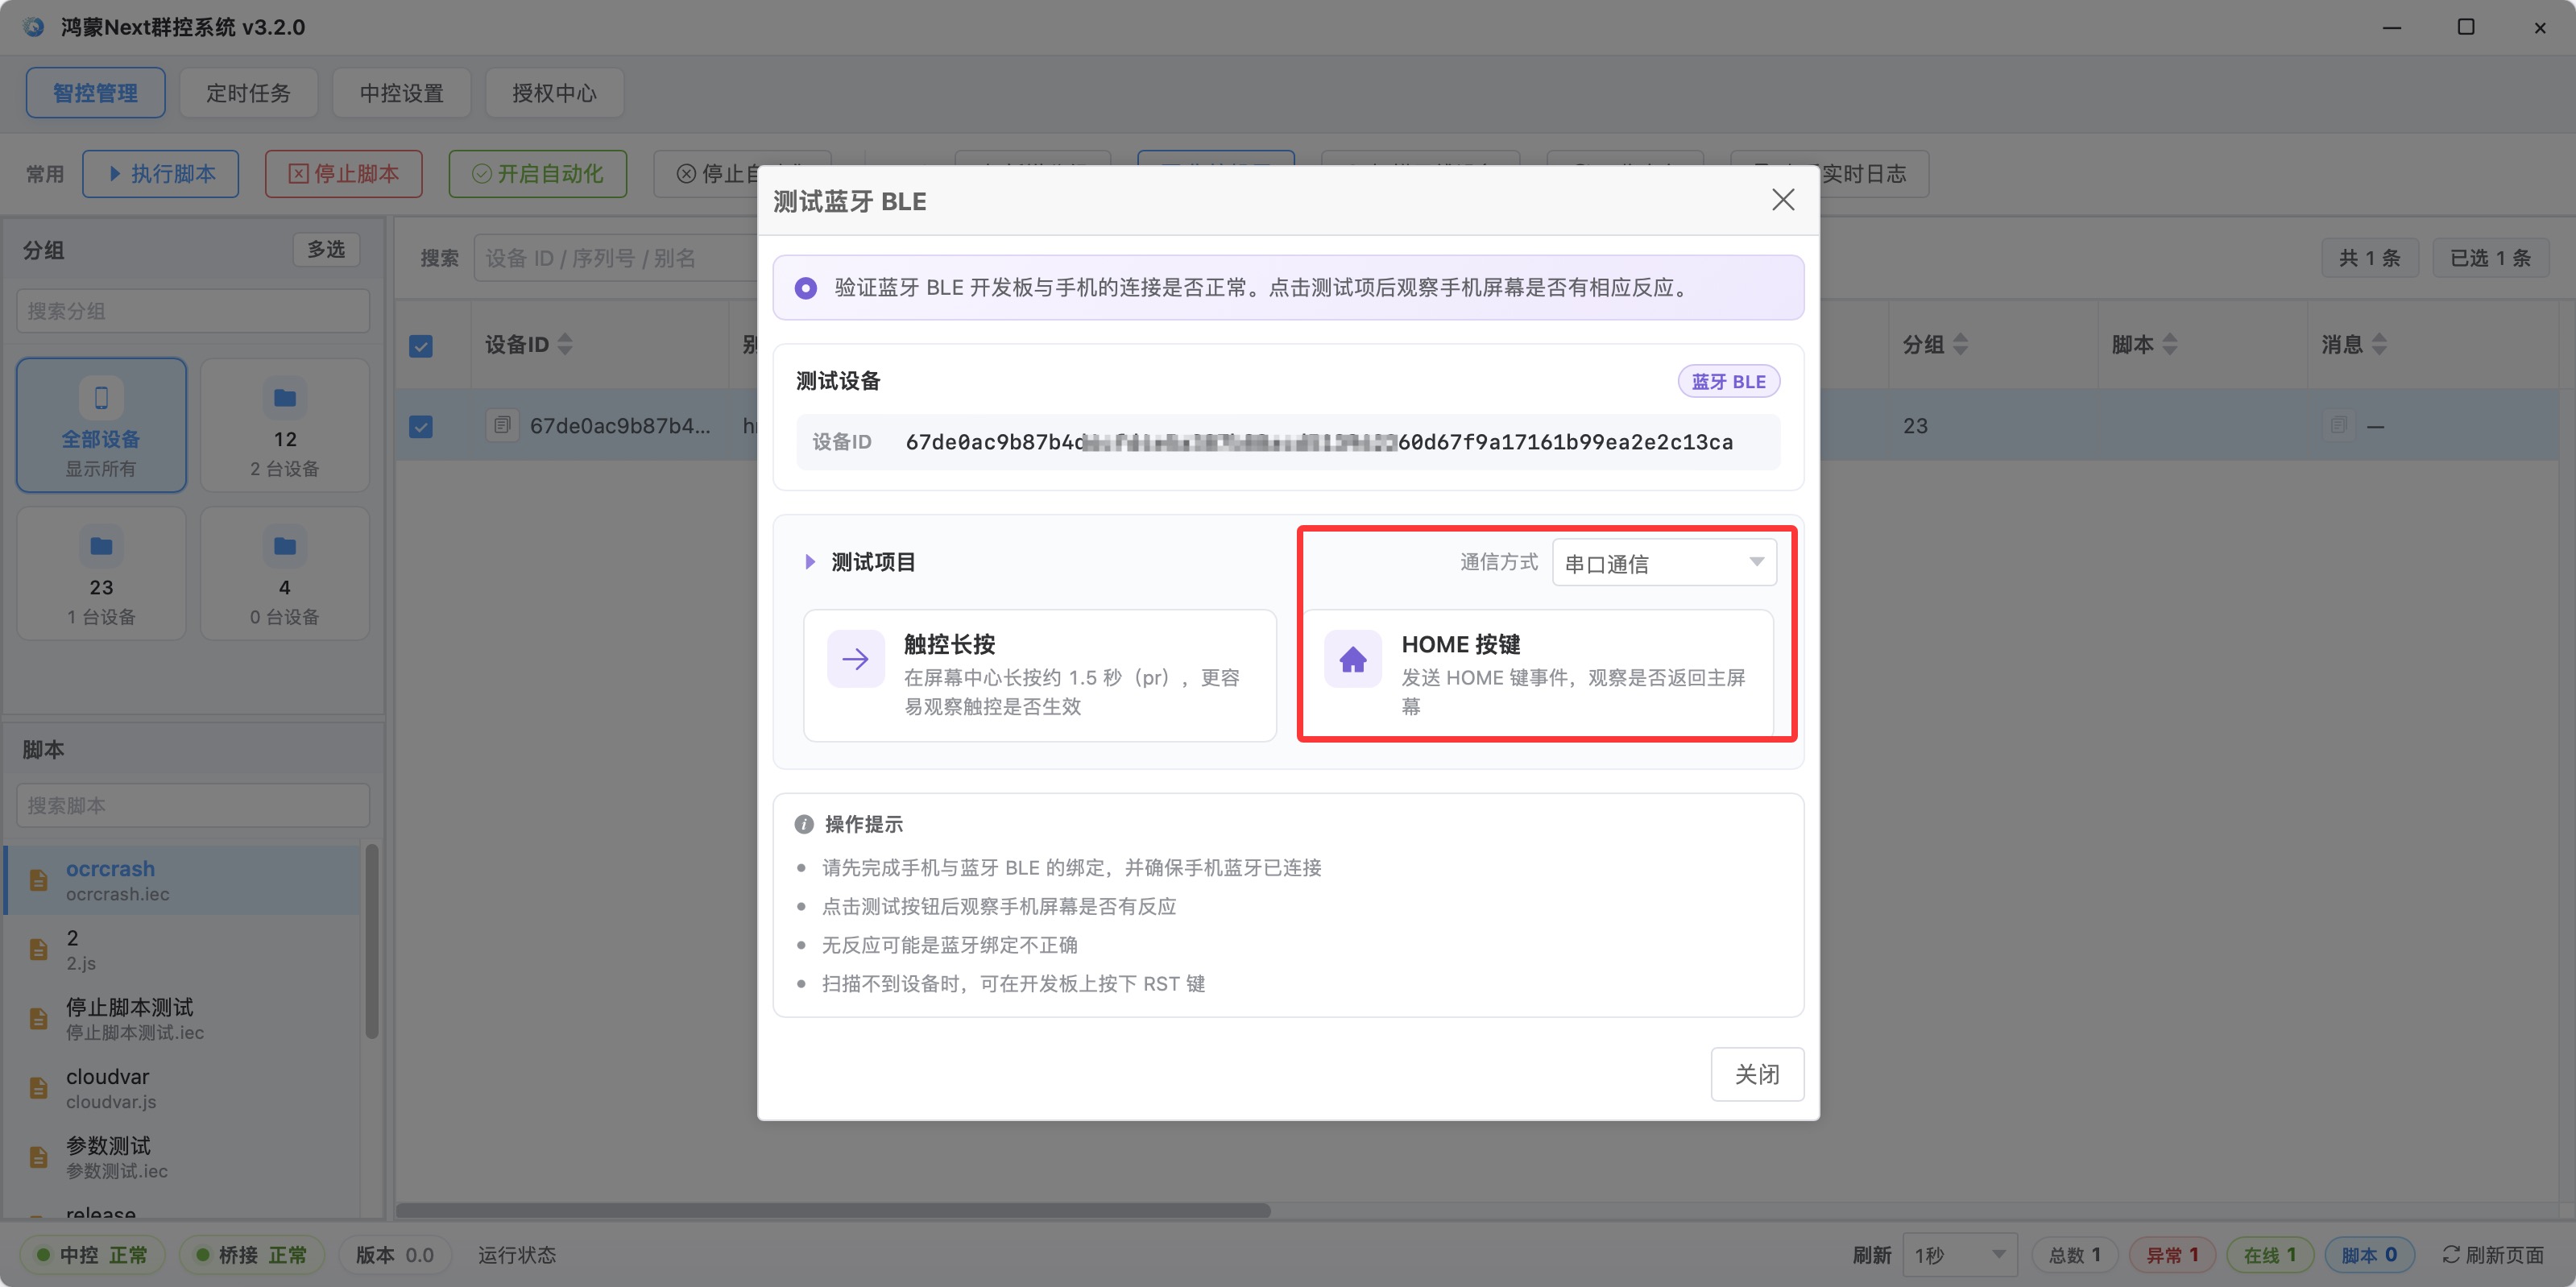
A reaction on the phone means the whole path is open. If there is no reaction, try this order: forget the device on the phone and pair again, press RST on the board to restart it, and test once more.
When you write a HarmonyOS script, the Bluetooth event object prefix is bleEvent. The call order is: set the transport first, serial mode with bleEvent.setSendCmdType(1) and network mode with setSendCmdType(2) (the board already needs a network); set the screen size with bleEvent.setScreenSize(width, height), and the width and height can be the screenshot’s pixel size; in serial mode open the port with bleEvent.openSerial; then tap, swipe, and keys, which are clickPoint, swipeToPoint, systemKey, and keyPressChar. systemKey supports system keys such as home, back, and recents. keyPressChar sends alphanumeric keys and shortcuts. Chinese long text should still go through proxy input after automation is enabled. An empty value or an empty string means success. Any other string is an error message. Write the success check against that convention. Do not compare it with a boolean true.
The screen-size step is the one most often skipped. A Bluetooth tap uses absolute pixel coordinates. Without a size set first, the computed coordinates are off. After a portrait/landscape switch you have to set it again.
A link that will not connect, and taps that miss
If Bluetooth will not connect, follow this order: hold the board RST for about 5 seconds and release, forget the device on the phone and search again; confirm the board is connected to only one phone; if you flashed firmware, power-cycle it; toggle the phone’s Bluetooth off and on and search again. If the Bluetooth MAC in the central control list does not update, first confirm the central control is 3.2.0 or later and started normally. After a successful bind you can reopen the bind dialog and check the current MAC, and if needed unbind and force a bind again. If taps do nothing or land in the wrong place, go back to the script and look at three things: whether the screen size was set first, whether the transport mode is right, and whether the bound MAC and the current serial port are the same board.
The board LEDs help read the state: a successful pairing stays solid for about three seconds and then goes out, a Bluetooth disconnect blinks slowly about ten times, and a Bluetooth search blinks quickly about fifteen times. One thing that is easy to skip: USB debugging in developer options is for automation and screenshots, and it cannot stand in for BLE pairing. Keep Bluetooth on at the phone. If the pairing drops, the events the script sends have nobody to receive them.
About EasyClick: A mobile automation script development platform covering three phone ecosystems: Android without root, iOS without jailbreak, and HarmonyOS. It also offers Apple script writing, Apple cluster control, Android cluster control, remote cloud control, and AI phone cluster control. → Explore all products
Ready to build it for real?
Every approach in this article can be built with EasyClick capabilities on iEasyClick — full documentation, developer tools and automation products, free to try.